15 Rustic Garden Pathways
I kept tripping over my first path. It was too formal for the rest of the yard.
I learned to match materials to how I actually use the space.
These paths are practical, relaxed, and easy to copy. They’re the ones I built, fixed, and still walk every day.
15 Rustic Garden Pathways
These 15 ideas are hands-on, simple to build, and budget-friendly.
I’ll show what worked for me and what I’d avoid.
You’ll get 15 clear ideas you can plant, buy, or lay this weekend.
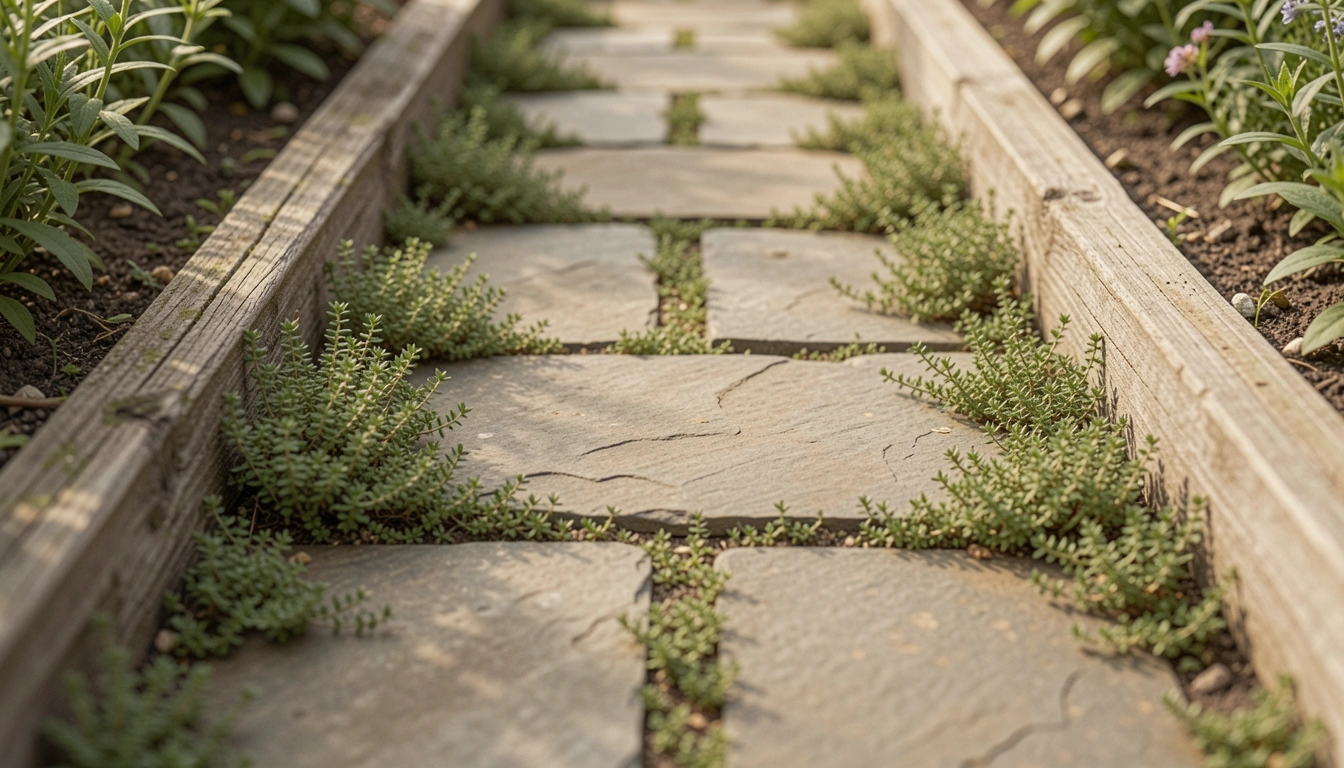
1. Flagstone Stepping Stones with Thyme Infill

I laid flagstones through a shady bed and the thyme softened every edge. The stepping stones read as casual, not formal. I loved the scent underfoot in summer.
At first I used too-large gaps and the thyme took ages to fill. I now set stones closer and press the thyme plugs in tight.
This path feels lived-in. It handles wet weather if the stones are bedded on crushed rock. I plant low thyme varieties that tolerate foot traffic.
What You’ll Need for This Look
- Irregular flagstones (1–2 inch thickness)
- Creeping thyme plugs (canescens or Elfin)
- Crushed rock base (3/4 inch)
- Landscape fabric (optional)
- Hand tamper
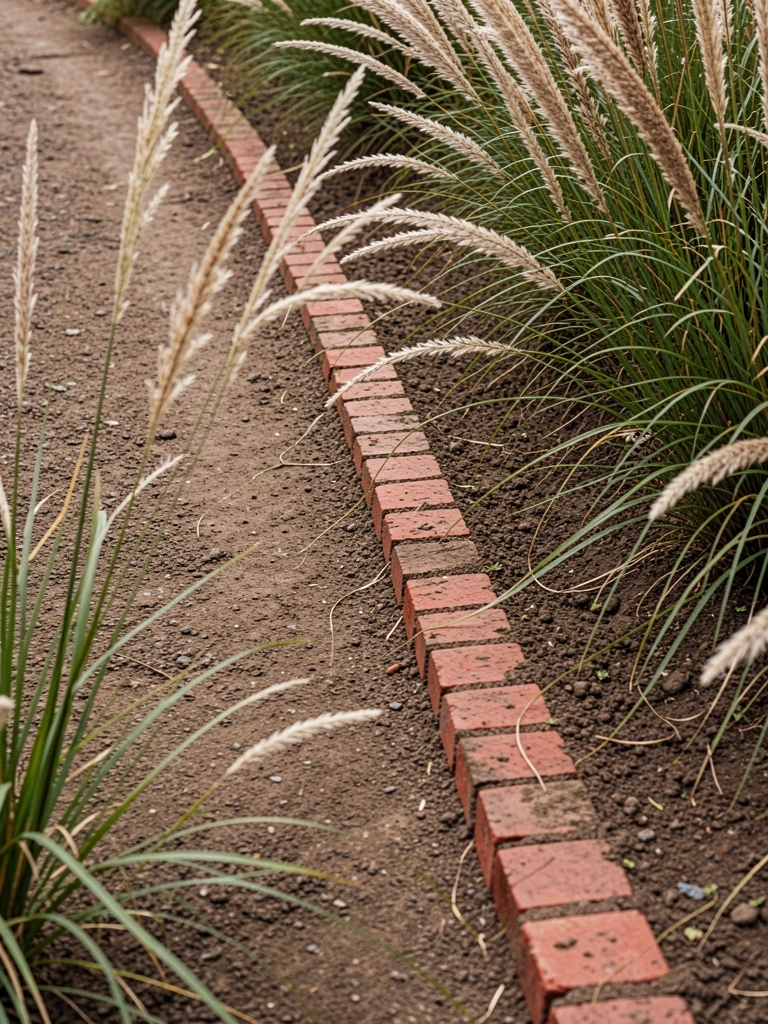
2. Reclaimed Brick Ribbon Path
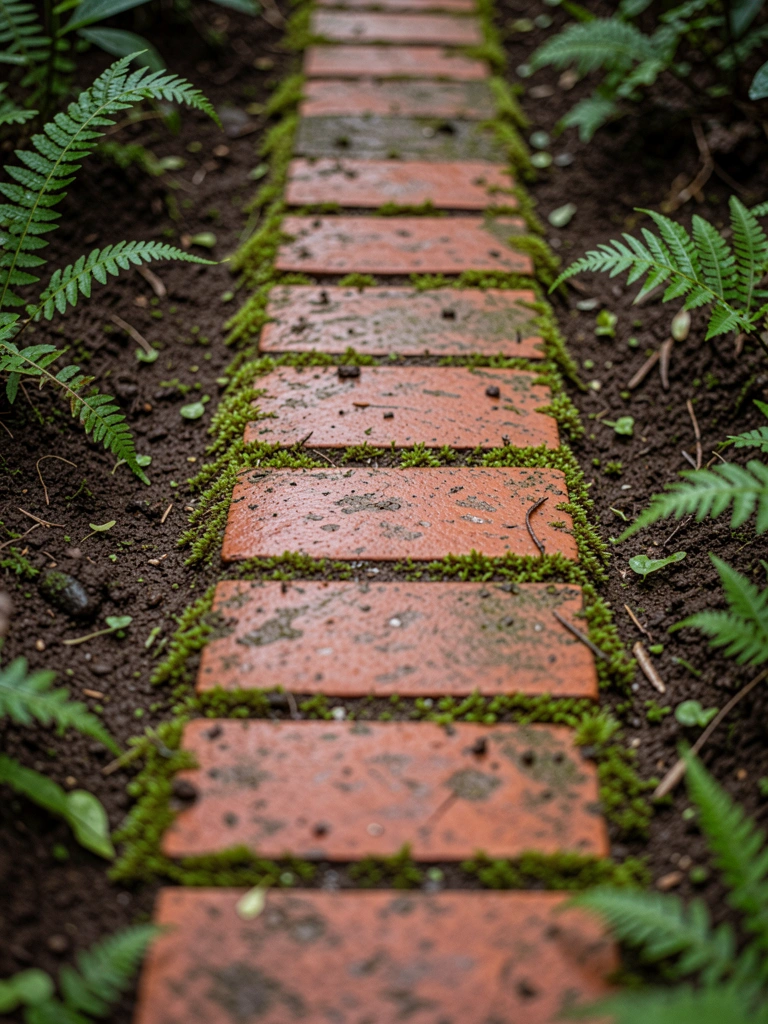
I salvaged bricks from an old shed and laid them in a single-file ribbon through the lawn. It’s unexpectedly charming and kids ride bikes around it.
My early mistake: I forgot to compact the base and a few bricks sank. Re-setting them taught me patience and the value of a proper base layer.
Visually, the ribbon splits the space gently. I let moss grow in the joints to soften the red and tie it to the beds.
What You’ll Need for This Look
- Reclaimed brick (single-file)
- Sharp sand for bedding
- Masonry joiner or pointing trowel
- Moss or low groundcover plugs
- Rubber mallet
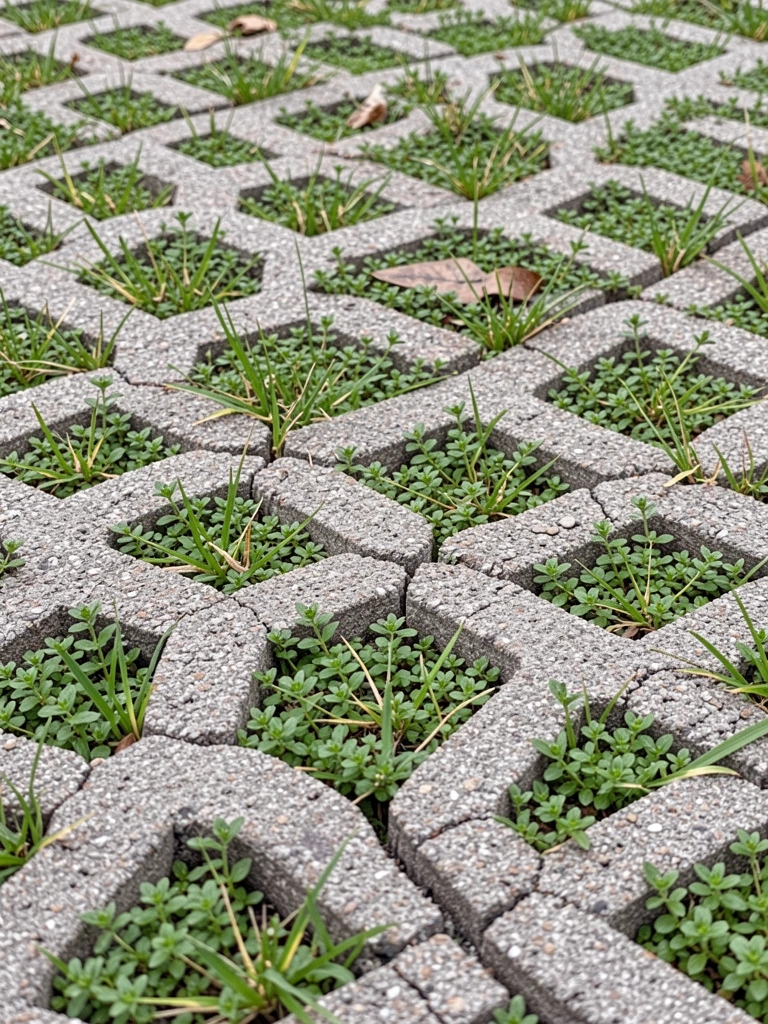
3. Crushed Gravel with Steel Edging
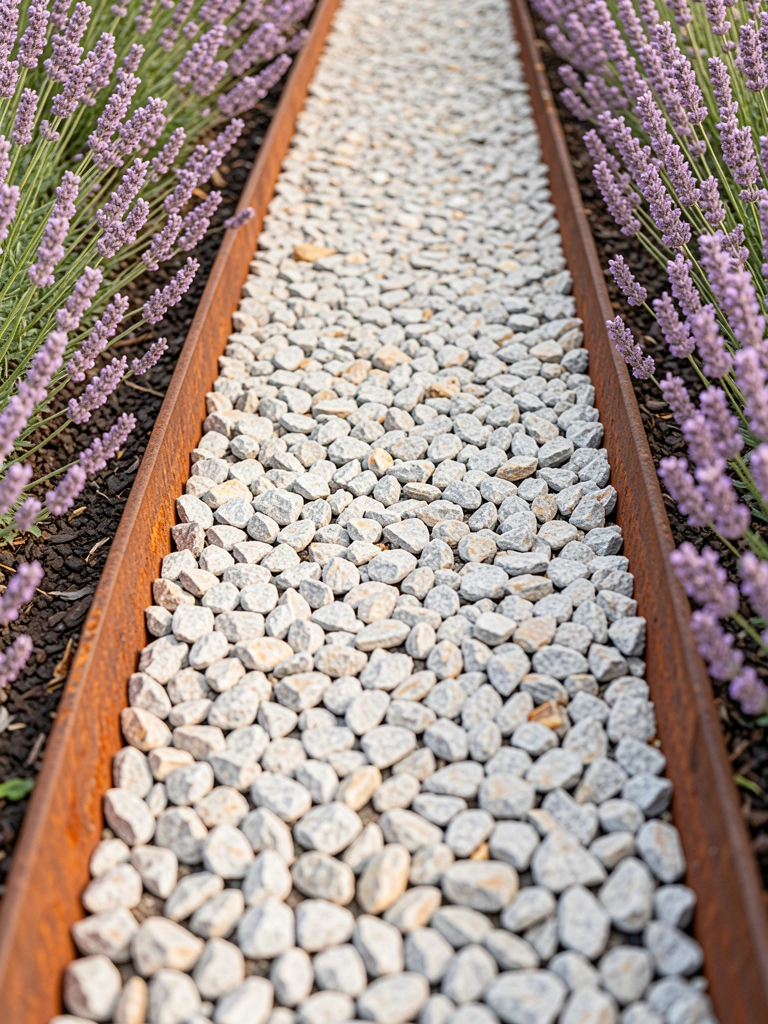
Gravel is honest and forgiving. I used crushed limestone and corten steel edging to keep edges neat. The sound underfoot is one of my favorite things now.
A mistake I made was using too fine a gravel — it compacted into mud. I switched to angular crushed stone and it drains and locks together better.
Pairing lavender or dwarf rosemary gives the gravel a soft edge. The steel weathers and reads rustic without trying too hard.
What You’ll Need for This Look
- Crushed gravel (3/8 inch)
- Corten steel edging strips
- Landscape fabric
- Lavender or dwarf rosemary plants
- Plate compactor (rental)
4. Rustic Timber Sleeper Steps
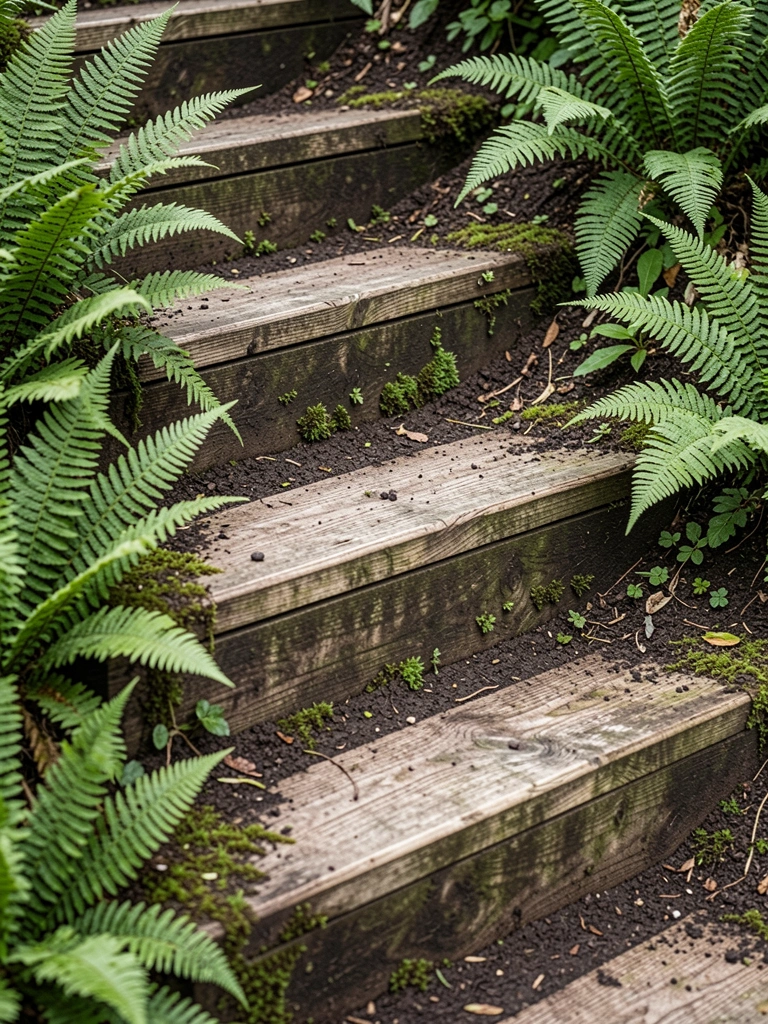
I built terraced steps with cedar sleepers on a slope and it felt immediate and sturdy. The wood warms up the space against stone beds.
I underestimated drainage initially; water pooled behind the bottom sleeper. Adding gravel behind each riser fixed that and stopped rot.
These steps age into the landscape. I use cedar for longevity and screw each sleeper to anchors. The result is a comfortable, rustic route up a hill.
What You’ll Need for This Look
- Cedar sleepers (4×6 or 6×6)
- Galvanized anchor spikes or rebar
- Coarse gravel for backfill
- Exterior wood screws
- Drill with long bits
5. Mulch Track with Stepping Logs

I tried a full mulch path and then added log discs as stepping markers. It reads casual, and kids liked the balance challenge.
I learned that thin mulch compacts; I now put a thicker bed and occasional stepping discs so the mulch stays put. Don’t skimp on depth.
This look is cheap and soft underfoot. It’s ideal beside vegetable beds where you want quick, low-maintenance access without hard paving.
What You’ll Need for This Look
- Natural bark mulch (3–4 inch depth)
- Sliced log discs (2–3 inch thick)
- Landscape fabric (optional)
- Pressure-treated stakes for anchoring discs
- Hosta or shade plants for edges
6. Dry-Set Granite Flag Path
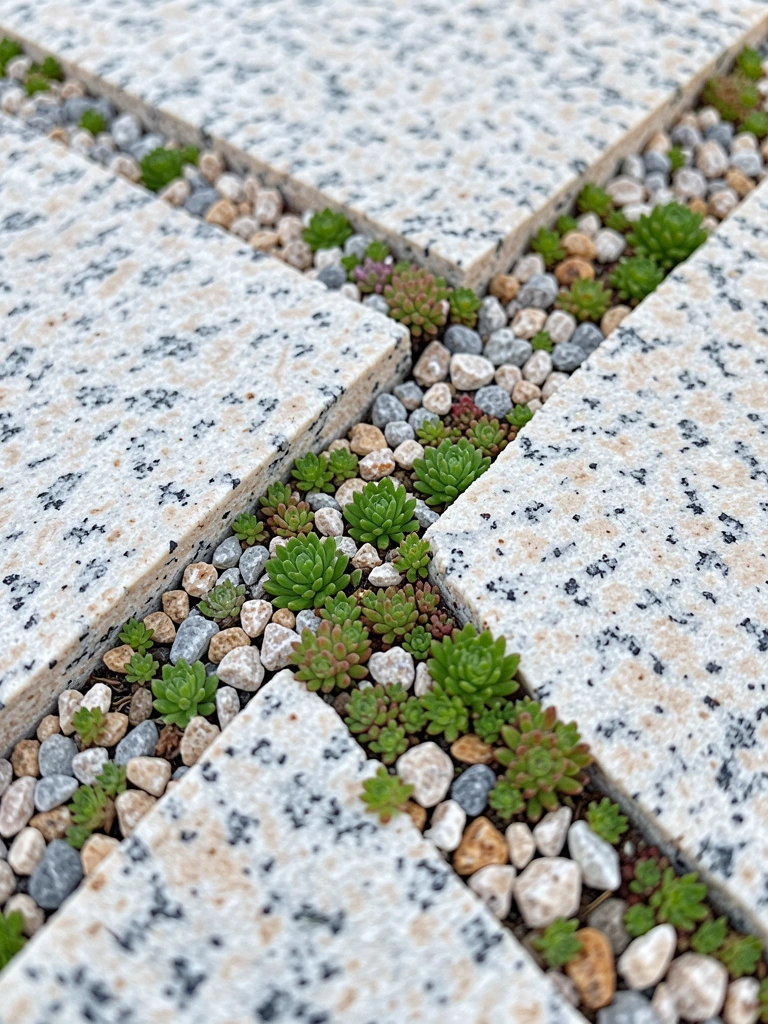
Granite flags look like they’ve always been there. I dry-set them on a crushed stone base and love the crisp edges.
I once set them on concrete and regretted the stiffness. Dry-setting allows for slight movement and lets plants peek through joints, which I prefer.
I fill the joints with small gravel and plant hardy sedums. The path resists traffic and stays handsome with little fuss.
What You’ll Need for This Look
- Granite flagstones (1–2 inch)
- Crushed stone base (3/4 inch)
- Small joint gravel (pea gravel)
- Sedum plugs for joints
- Rubber mallet and level
7. Cobble Mosaic Curve
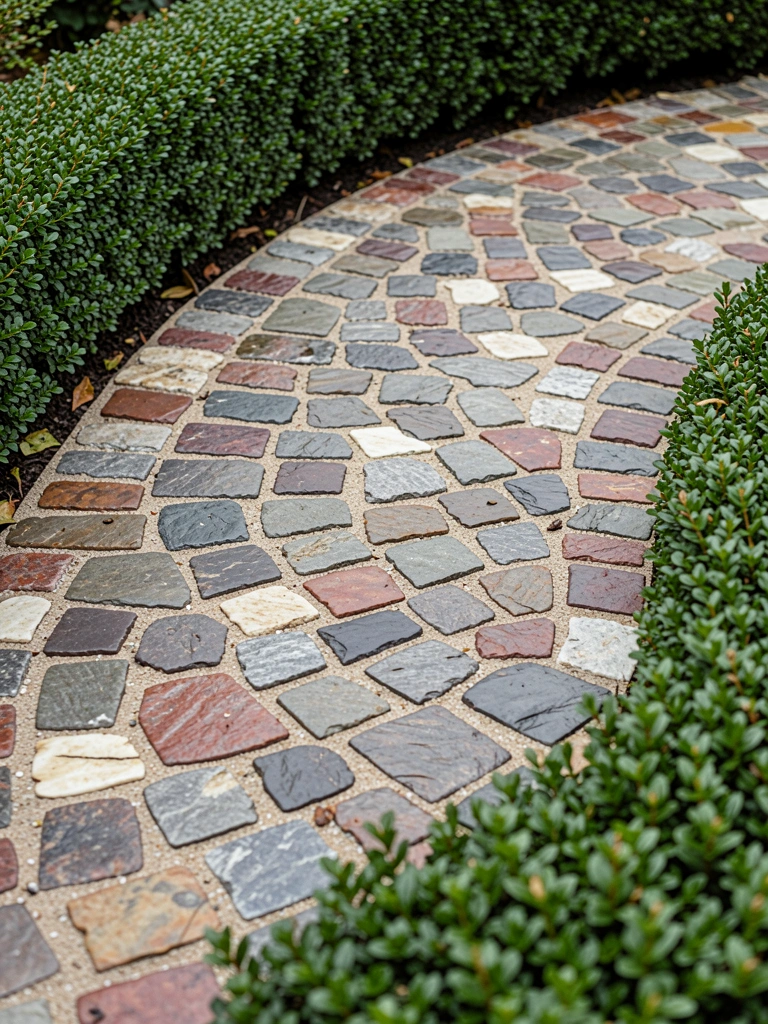
I laid a short curved nook with mixed cobbles. It took time, but the curve made a tiny, inviting space for a bench.
My mistake was starting with too-large cobbles; the pattern looked clumsy. I re-laid with more uniform sizes and the curve read softer.
This route has a handmade feel. The irregular surface catches sunlight and shadows. It feels like walking through a lived garden history.
What You’ll Need for This Look
- Mixed cobbles (4–6 inch)
- Bedding sand
- Pointing sand or mortar (if permanent)
- Small boxwood or low hedge plants
- Rubber mallet
8. Stepping Slate through a Wildflower Meadow
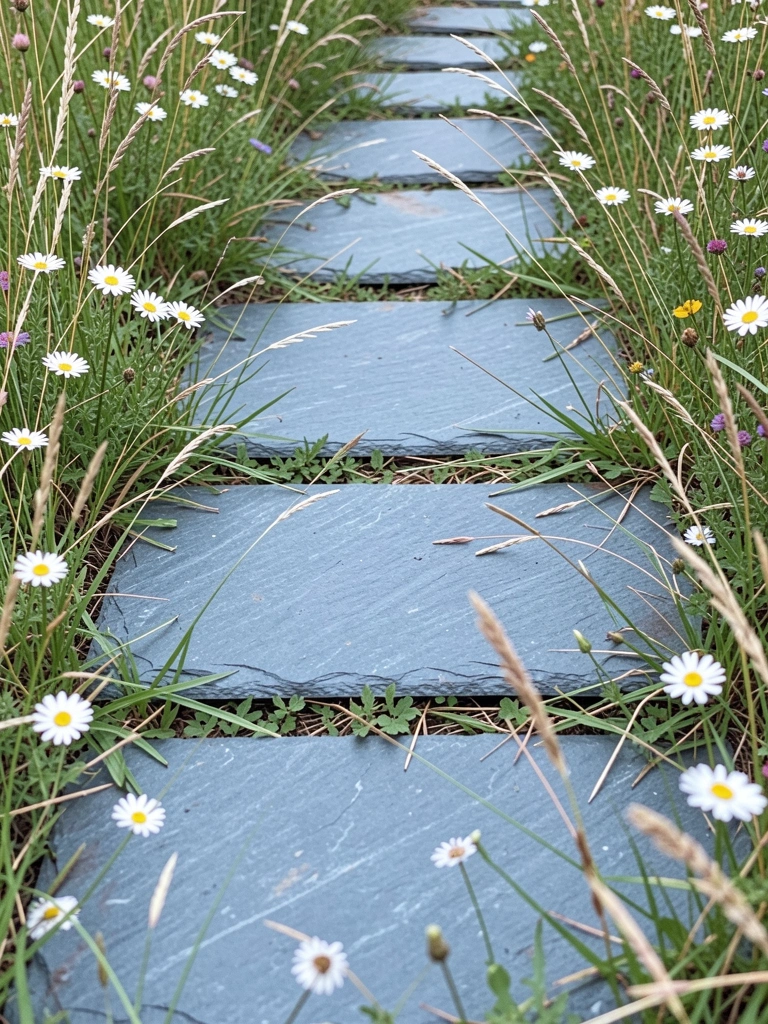
I cut thin slate into rough shapes and spaced them through a wildflower patch. The path feels like it was always part of the meadow.
At first I placed stones too far apart and found myself walking on flowers. I tightened spacing and made a clearer line without ruining the meadow.
This gives a loose, countryside vibe. It’s low-maintenance and supports pollinators. I avoid heavy foot traffic here, keeping it gentle for plants.
What You’ll Need for This Look
- Thin slate stepping stones
- Native wildflower plugs or seed
- Turf cutter or edging tool
- Hand tamper
- Mulch for newly planted wildflowers
9. Packed Earth with Brick Peripheral
I made a simple packed-earth route for my vegetable garden using reclaimed brick as an edge. It feels honest and suits the utilitarian beds.
I learned to compact in layers. My first flat pack washed away after rain. Adding a thin layer of sand, then compacting, reduced erosion.
This path breathes and helps water soak in. The brick edge keeps beds tidy without looking fussy.
What You’ll Need for This Look
- Compacted earth (layered)
- Reclaimed brick for edging
- Plate compactor or tamper
- Ornamental grasses for border
- Coarse sand for stabilization
10. Mosaic Tile Step Inserts in Concrete
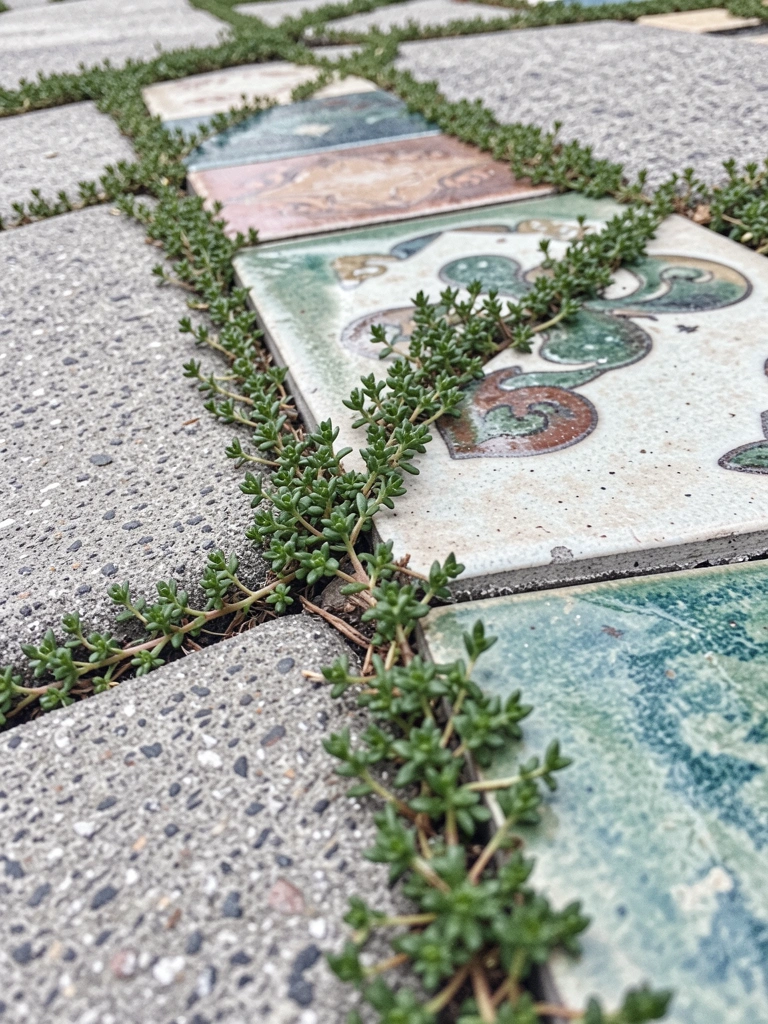
I put small, weatherproof tiles into a plain concrete path to add personality. The tiles are imperfect and give a collected, old-house feeling.
I did one panel too busy and regretted it; subtlety works better. Now I use muted colors and repeat a simple motif for rhythm.
The tiles make you slow down and notice plants. They’re a good way to introduce pattern without a full paving overhaul.
What You’ll Need for This Look
- Exterior-grade ceramic tiles (small)
- Concrete mix
- Tile adhesive and grout for outdoors
- Low thyme or moss for joints
- Protective sealer
11. River Rock Border with Packed Flagstone
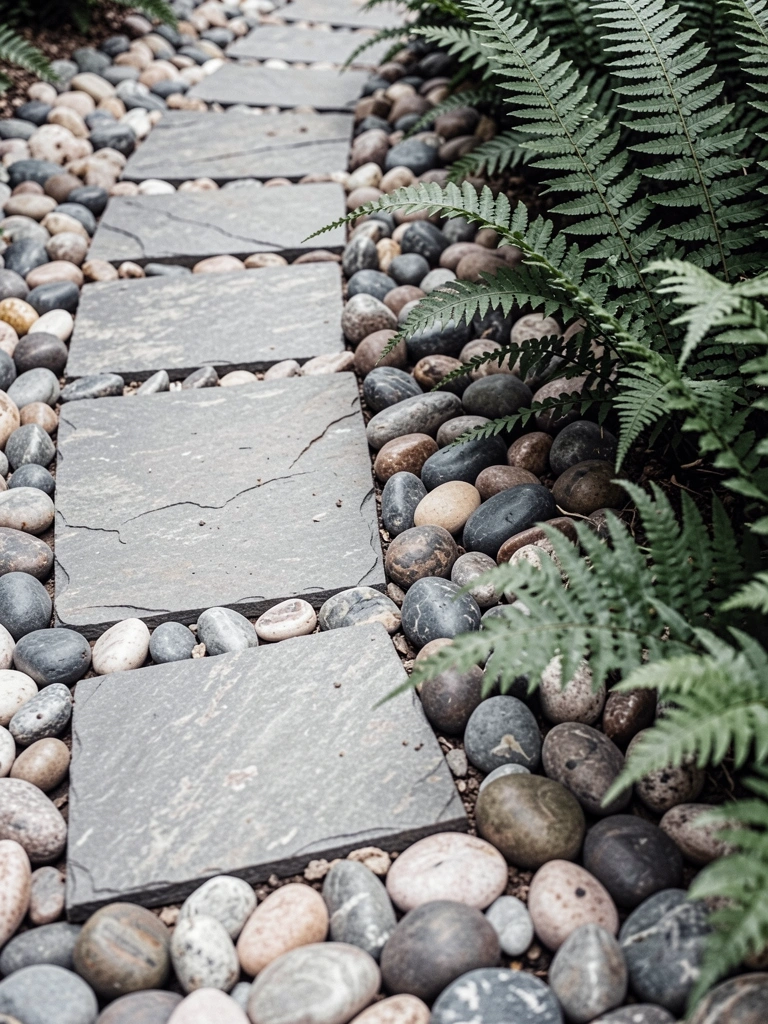
I paired flat flagstones with a river-rock border to hide uneven edges. The rounded stones catch leaves and make the path read natural.
At first I used too few border rocks; wind moved them. I filled the trench deeper and wedged the rocks so they stay put.
This combo handles runoff well and feels like a creek bed. It’s forgiving and hides imperfect cuts in the stones.
What You’ll Need for This Look
- Flat flagstones
- Smooth river rocks (various sizes)
- Trenching shovel
- Coarse sand or crushed stone for bedding
- Ferns or shade plants for edges
12. Cobblestone Centerline with Gravel Sides
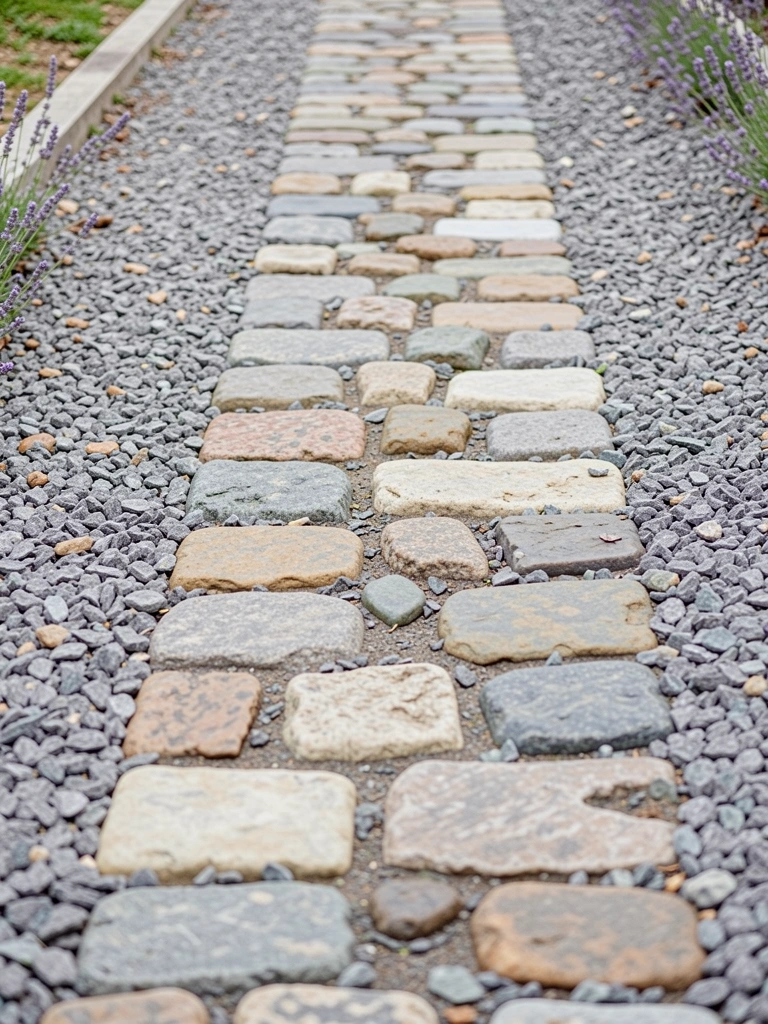
I installed a cobble centerline down a wider drive and filled sides with compacted gravel. It gave character without full paving.
My early mistake was not pegging down the cobbles; they shifted. Adding mortar at contact points stabilized the line while keeping gravel flexible.
The centerline draws the eye and makes a wide runway feel intentional. Lavender along the margins hides the gravel edge and scents the air.
What You’ll Need for This Look
- Cobblestones for centerline
- Crushed gravel for side fill
- Landscape pegs or mortar for cobbles
- Lavender plants
- Compacting plate
13. Flagstone Pad Stepping to a Rustic Bench

I made a series of flagstone pads leading to a favorite bench spot. The pads give breathing room to the planting and feel intentional without a full walkway.
I once put pads too close; it read like a patio. Spacing each pad about a stride apart made the approach feel relaxed and purposeful.
The bench now sits as a small destination. The path invites a slower pace and gives plants between stones a chance to show off.
What You’ll Need for This Look
- Irregular flagstone pads
- Gravel or sand bedding
- Weathered wooden bench
- Sedges or small shrubs for gaps
- Rubber mallet
14. Permeable Paver Grid with Groundcover
I used permeable pavers where cars sometimes pass. The grid holds up and the groundcover softens the gaps.
My first try had soapstone sand that washed out. Switching to angular joint filler and planting Corsican mint kept the plan tidy and fragrant.
This solution balances structure and softness. It’s practical for low-traffic drives and keeps runoff down while staying rustic.
What You’ll Need for This Look
- Permeable concrete pavers
- Joint filler or angular gravel
- Corsican mint or fine groundcover
- Plate compactor
- Edge restraints
15. Natural Stepstones through a Woodland Shade Bed
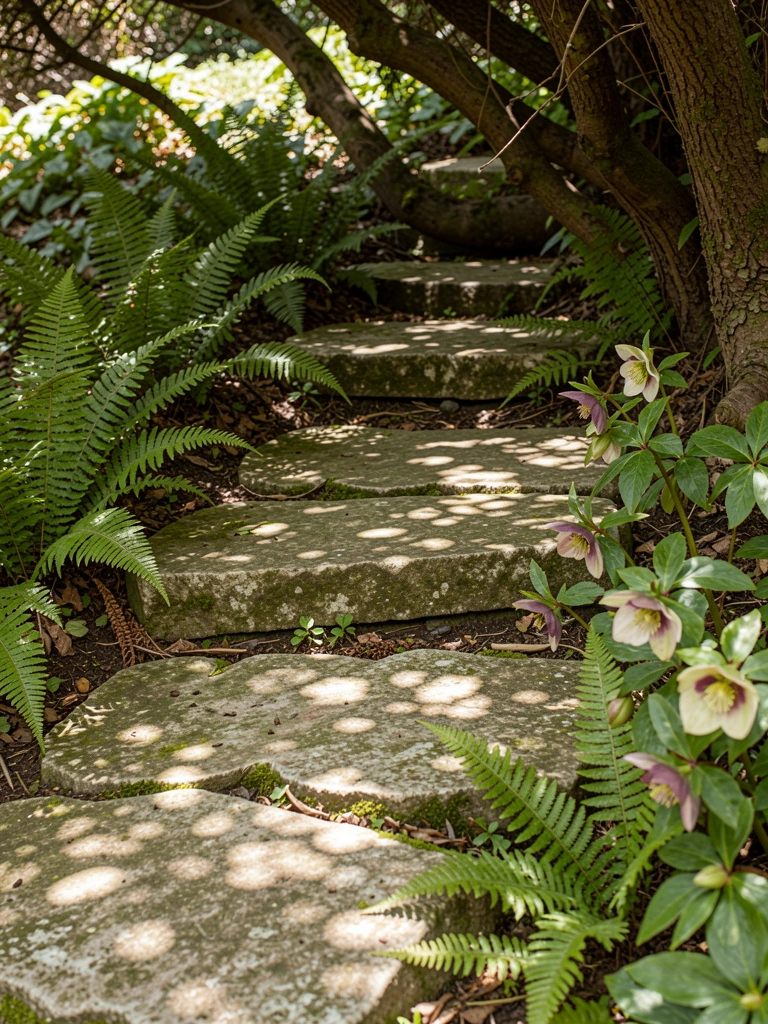
I carved a path of irregular stones under trees and planted shade lovers around them. It’s quiet, cool, and honest to the site.
I once used sun-loving plants nearby and they sulked. Matching the plants to shade and soil made the path feel like it belonged.
Now it reads as part of the woodland. Moss and fern edges make each step soft and slow the pace, which I like.
What You’ll Need for This Look
- Irregular natural stepstones
- Shade-loving plants (ferns, hellebores)
- Moss plugs (optional)
- Coarse sand for bedding
- Hand tamper
Final Thoughts
You don’t need to build every path. Pick one that suits your use and budget.
Start small. Fix what you learn and let the garden settle into it.
Paths age into the yard. They should be useful, comfortable, and feel like you.